Showing posts with label MichelleMyBelle. Show all posts

Thursday, December 12, 2013

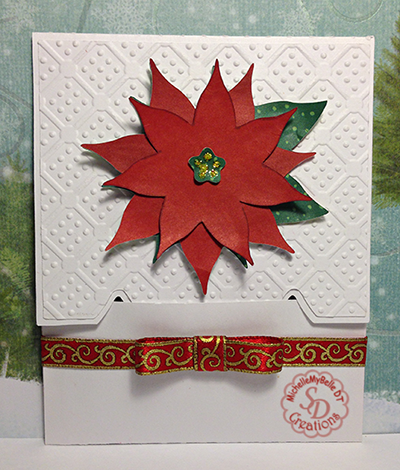
Poinsettia Gift Card Holder

poin copy
Today  for my Gift Card Holder project I'm using  ScrappyDew Creations Free Poinsettia pattern file.
You can download it Here for a limited time!
I also used Brenda's Gift Card tutorial.  With so many cards to make I needed something easy and quick!  This project was perfect.  Once my poinsettia was cut, I took my stylus and distressed the paper a bit. Because the paper has a white core I couldn't distress it too much. I added some yellow Stickles to the center. The front mat was embossed using a Sizzix embossing folder  - Hello Kitty I believe. I don't have the packaging any longer.
poin2 copy
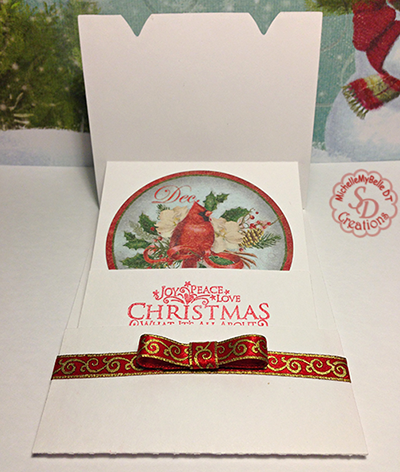
This is the inside of my card. the stamp is from Inkadinkado - Holiday Filigree. I love that set! It was stamped using Martha Stewart Ink. The Cardinal is a Die-Cut from K&CoMPANY - Elizabeth Brownd. The ribbon was purchased from Big Lots over a year ago. The gift card gets tucked in between the cardinal and the stamped sentiment.
poin4 copy
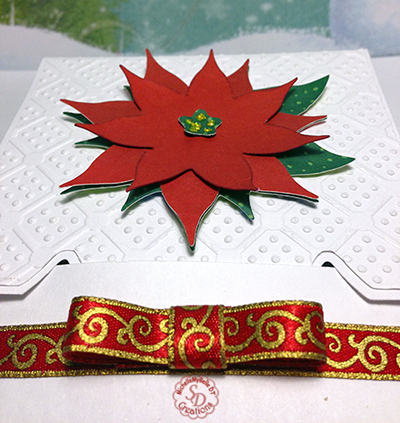
A closer look at the poinsettia. I used Scotch 3D Foam to give it some dimension.
I hope you enjoyed my quick project.

MichelleMyBelle

Wednesday, August 21, 2013

Spider Broom Lollipop


How cute is this project? 
I created it from a new tutorial posted at Splitcoaststampers. They are so easy and very quick to work up. I had wanted to do a Print & Cut of the spider, have him hanging down the broom handle. My Silhouette Portrait had difficulty reading the Registration Marks. No matter how much light I had on it. So, I just created a tag and glued it to the broom handle or lollipop stick. :) 
I used "Spider Hanging Out" pattern file by ScrappyDew. 
You can visit the ScrappyDewCreations Facebook page and download the cutting file. 

I plan to make a bunch more for my sons class. 
Have a Great Day!

MichelleMyBelle

Wednesday, April 17, 2013

Gobbling Goodies Glass Candy Jar


For my project today I've decorated a Glass Candy Jar for my son. I'll fill it with sugar free candy, for the time being it contains LifeSavers.

ScrappyDew Affiliate Links used for the Portrait and Make the Cut


Using Make the Cut, I placed a 2 inch circle on my cutting mat. For the text on the top label I used Comic Sans MS font. I added Gunnar to the mat first then Gobbling Goodies, re-size text accordingly.  Holding down the CTRL Key drag Gunnar text wrapping it to the circle. Adjusted settings.

 Next take Gobbling Goodies text - Shape Magic - Flip - Shape Magic - Mirror -Hold down CTRL Key   drag the Gobbling Goodies text wrapping it to the circle. Again adjusting the settings.


Select one of the monster pattern files, re-size accordingly and place inside your circle. 
I selected another monster, removed the center part of the crayon, typed out my sons name using Giddyup ST Font. Re-size the text and place in the center of the crayon.
 When printing out your design you want to hide the circle. Once done printing let dry at least 2 hours, place your Clear Sticker Paper on the mat, I hid all the layers inside the circle leaving the circle visible and the black monster holding the crayon. Be sure to click on the Texture Snapshot Icon before cutting, if you don't it will cut the individual pieces of your monster.


I hope you enjoyed this quick project.
Michelle

Tuesday, March 5, 2013

Easter Card

Had some free time this afternoon, decided to make an Easter card.
I used two different embossing folders by Darice, Cloud Sky and Spring Tulips. I applied some Pebbles Classic Chalk to the cloud edges and flowers.


I did a Print & Cut using ScrappyDew Easter Bunny Kids cut a oval scalloped mat using purple Recollections Textured Cardstock. Applied some purple Stickles. 


Martha Stewart Edge Punch was used for the white and purple textured cardstock. My Thoughts Exactly Easter Greeting Sentiment stamps. 

Thanks for looking!
MichelleMyBelle

Sunday, February 3, 2013

Valentine's Day Kitty Treat Holder

 My project today uses ScrappyDew Valentine's Day Kitty pattern file.

It's game day so a real quick project. LOL
This heart treat holder file is by Lysa.
You can use this as a card or treat holder. I embossed the tag with a heart embossing folder, attached the printed image using Scotch Foam Adhesive. 

I did not decorate the front heart because of the slit. 

Supplies: ScrappyDew Valentine's Day Kitty, Red Cardstock, K & Company KP Valentine Paper Stack, Ribbon and Heart Embossing Folder.

Thanks for looking!
Michelle


Thursday, January 31, 2013

Lover Bugs Valentine Card


 For my Valentine Card project I used the Lover Bugs pattern file by ScrappyDew.

The white card base is cut at 12 L x 5w folded in half,  punched with a Martha Stewart Edge Punch. I cut 3 red mats at 4 3/4 w x 5 1/2 L punched using the same punch. Now, if your punch has a larger design you may have to adjust your mat size. One mat for the front, two will be used for the inside of the card. Glue in place, make sure the mats for the inside of your card are secured well. You will be attaching the inside fold to them.


Next I cut and scored the inside fold for my card, you'll want to glue all your pattern paper, mats and do any stamping before gluing to your card base. The red mat with the stamped image I cut at 3 1/4 square, the same for the white mat, then I used the same edge punch. The stamp set coordinates with my paper stack, both from Martha Stewart - Enchanted Woodland. I also fussy cut a flower branch from the paper and adhered to the stamped image, added a pink flower.

After all is dry then you can glue your fold to the inside card base. I started at the bottom first making sure all sides are lined up, then I glued the top section. I closed my card, keep something heavy on top until the glued has dried. You won't have any warping. 

While my card was drying, I inked and put together my paper piecing. My wings are vellum, I applied X-mas Red Stickles to them. The heart doilie is by Bird. Attached my piecing using Scotch Foam Mounting tape, added Rhinestones to the smaller hearts above their heads and more stickles.
Phew!! I think that's it, LOL If you stuck with me through this whole post I attached the file for you inside fold. Tutorial

Supply List: Lover Bugs File ScrappyDew; Heart Doilie File Bird; Red, Black, White Cardstock; Enchanted Woodland Paper & Stamps Martha Stewart; Vellum; Lovey Puns Animal Stamps My Thoughts Exactly; Inkadinkado and Studio G Ink; X-Mas Red Stickles; Rhinestones; Martha Stewart Edge Punch; Quick Dry Adhesive & Foam Mounting Tape Scotch. 

Thanks for looking!
Michelle

Sunday, January 13, 2013

Some Bunny Loves You


How cute is this card! 
I'm using a file that is not yet available in the ScrappyDew Store, will be available soon. Just realized my card is sitting crooked in the flower frog, oops. LOL

The pattern file is called "Some Bunny Loves You". 

I placed a Basic Heart Shape on my mat in Make the Cut, copy and pasted it, then flipped it and did a weld to create my heart card. 

I cut all my pieces, chalked the edges of the bunny. For the floppy part of the ears, I used some Scotch Foam Adhesive to give it some depth. I did the same for the hands. For the red heart I took a white Sakura Gelly Roll pen and created some decorative faux stitching. Once dry, glue the heart card to the red heart. For the inside cut an extra white heart and glue in place, I stamped a sentiment from My Thoughts Exactly using some Martha Stewart ink.

For the outside of the card I applied some Rhinestones and a rose. Then attach your bunny. 

Supplies: 

ScrappyDew Pattern File - Some Bunny Loves You
My Thoughts Exactly Sentiment - Lovey Puns
Martha Stewart Ink
Pebbles Classic Chalks
White and Red Cardstock
Martha Stewart Paper Stack - Enchanted Woodland
Scotch Quick Dry Adhesive
Scotch Foam Adhesive
Sakura Gelly Roll White Pen
Queen & Co. Rhinestones
Recollections Rose

Thanks for looking!
Michelle


Wednesday, January 9, 2013

Fall Grab Bag


These bags are a great way to give that perfect little gift to someone. They can be filled with treats, a gift for someone in a nursing home or hospital, maybe even a birthday.

I used ScrappyDew Fall Crows to decorate the outside of my bag.

After cutting the petals, I inked each one and used my McGills Paper Blossoms Tools to give the petals some shape. As well as the cornstalks, corn and pumpkin. I also inked all edges of the crow. 

I cut a leaf from the patterned paper to create my tag. It added the perfect element for my bag. When purchasing a paper stack, I will select a stack that can be used in different ways. For example, it may have a decorative sheet that can be used as tags or mats for my cards. 

Supplies: 

Fall Crows Pattern  - ScrappyDew
Brown and Green Cardstock - Bazzill
Halloween & Fall Paper -  K & Company
Ink Metallic’s Pigment -  Inkadinkado
Orange Truffle -  Trendy Twine
Paper Blossom Tool Kit - McGill
Black Cat Cougar
Make the Cut Software

Thanks for looking!
Michelle

Monday, December 10, 2012

Christmas Tree Card


For my project today, I used the ScrappyDew Christmas Tree Freebie from this past week. 
I embossed the white mat and each of the tree pieces. In Make the Cut I joined all the layers of the tree and then created a shadow layer. I cut the shadow from red cardstock and the tree layers in white. I then framed the white mat in ribbon and attached small red tied bows to the corners. I also attached red tied bows to my tree. 
I have many cards to make and kept it pretty simple. 

Thanks for looking!
Michelle


Sunday, November 11, 2012

Christmas Bulb Card

For my project today I used ScrappyDew Christmas Bulb Set.

My ornament is cut from the Glitzy Glitter Stack - Brights by DCWV. I love that paper, it cuts like butter and has such a nice shimmer to it. I also used plain white cardstock. 
The embossing folders are by Sizziz - Hello Kitty Spring and their Dots folder. Not quite sure if they refer to it as Dots. 

The mat is a file I made for Mojo Monday's.  You can download the cutting card files on my blog Here. Look for Card Sketch 265.

I attached some sheer ribbon and hung a Clear Chrystal from it.

Thanks for looking!
Michelle

Thursday, October 4, 2012

Match Box - Candy Boxes


Just a quick project for today. 
I'm always looking for little packages to hand out treats during Halloween. My son
has many therapists, teachers and aids, so they'll be perfect.  I did a Print n Cut using the ghost and bat from ScrappyDew Happy Hauntings pattern set. The coffin in the background is a project I made last year using the vampire from the Halloween Pack by ScrappyDew.
The match boxes are a file from Lettering Delights called Simple Match Boxes. I used left over scraps I had from a previous project to cover my match boxes.  I re-sized them to fit two
Hershey Nuggets.

The inside of my boxes

Supplies: ScrappyDew Happy Haunting pattern set and Halloween Package (vampire), My Thoughts Exactly Ghostly Greetings Stamp Set, LD Simple Match Boxes, Pebbles Classic Chalks, Scotch Quick Dry Adhesive, K&CoMPANY  Jen Yanok Halloween Stack, Stickles and Recollection jar flowers.

Thanks for Looking
Michelle

Monday, October 1, 2012

Just Hanging Out Spider Card


I managed to create another Halloween Card. Just maybe this year I will be ahead of the game! LOL

I used ScrappyDew Just Hanging Out Spider pattern set. I embossed the purple
mat using a Cuttlebug embossing folder. The spider web border is a Martha Stewart
border punch. The spider web paper is by K&CoMPANY, Kelly Pannacci
Halloween stack. For my spiders legs and nose I applied Doodlebug Designs Sugar Coating Glitter - Beetle Black. To the rim of the hat I used some Stickles.

The inside of my card, I used Inkadinkado Metallic inks on the web and spider.

Again, I used the Cuttlebug embossing folder on the purple mat. Resized the web 
shadow layer to create a mat for my stamping.
The sentiment is from My Thoughts Exactly - Fright Nights.
Thanks For Looking
Michelle

Tuesday, September 25, 2012

Stacked Up Pumpkins Card


Today I used the Stacked Up Pumpkins file to create my card. 
I took the shadow layer - copy and pasted it - flipped and welded both pieces at 
the bottom. 
For my spider, I applied some glue to the legs and sprinkled them with
DoodleBug Designs Sugar Coating - Beetle Black.


Inside of my card, my son helped out with the sentiment stamping.  LOL
Reason why it is a little slanted. :)
The sentiment is from My Thoughts Exactly - Ghostly Greetings
I chalked the inside mat edge and then used a floral stamp all around the edges.
I applied some of the same Beetle Black glitter to the nose of my spider.

Supplies: ScrappyDew Stacked PumpkinsMy thoughts Exactly Stamps, Trendy Twine, DoodleBug
Designs Sugar Coating, DCWV Textured Neutrals, Inkadinkadoo Fancy That Stamp, White Cardstock, Tim Coffey Fall and Halloween Stack, Studio G Ink.

Thanks For Looking
Michelle

Sunday, September 16, 2012

Fall Angel


My project is made using the Free Fall Angel cutting file by ScrappyDew. 
The file can be downloaded for a limited time by going to http://www.scrappydew.com/news/

For her hair, I used the Swirl Embossing Folder and some Trendy Twine for the bow.
Inkadinkado Ink for the edges, K&Company Tim Coffey Designer Halloween & Fall Stack and 
the Specialty Paper Stack. Brigit's eyes, you can find them here: http://irishmist59.blogspot.com/2012/02/cute-eyes-svg-and-mtc-files.html

Thanks for looking
MichelleMyBelle

Monday, September 10, 2012

Super Palz 2 Candy Box


For my project today, I'm using ScrappyDew Super Palz 2

On the front cover I used Harley Girl. I cut the grey mat from DCWV Glitsy GlitterStack, Neutrals. I love that paper, it has so much shimmer without the mess of glitter!
I applied some X-mas Red Stickles to the white cutout and to the green I used Tim Holtz Alterations Texture Fades, Checker Board and Cracked Set.


I had to incorporate the Joker Boy somehow in my project, LOL My Signal was cut from Vellum. The  Signal is not included in the set, it's something I made in MTC program. For the buildings, I used the Knife Tool and the Node Editing Tools to separate them in the MTC program. I did not punch out all the windows, wanted the appearance of abandoned buildings. I cut vellum for the windows, but when I decided to use the signal it was showing through. So I added some yellow behind the vellum.


I added some additional bats to the candy box front. 
The box file is from Ginger on the MTC Forum. 
 
Supplies used: ScrappyDew Super Palz 2 Set, Recollections Cardstock, DCWV Immortal Love CardStock, White CardStock, DCWV Glitsy GlitterStack Neutrals, X-mas Red Stickles, Tim Holtz Alterations Checker Board and Cracked Set, Ashley E Red Ribbon, Bazzill CardStock.

Have a Great Day!
Michelle

Tuesday, August 14, 2012

Costume Kids 2 - Wall Decor

I decided to create some Halloween Decor. I have seen a lot of Halloween projects posted recently. That has gotten me in the mood for Halloween! LOL

I used ScrappyDew Creations Costume Kids 2 to create my project. I applied some Stickles to the stars, because the black paper is not very good quality my star edges are a little deformed. I'm trying to use up all my scraps. Lesson Learned. LOL

Just added a bit of ribbon in between the folds and that's about it. A quick and easy project. The Threaded Rosette file is from Lettering Delights.

Thanks for looking!
Michelle

Saturday, August 4, 2012

Hunting Season 3D Card


For my project today, I'm using ScrappyDew Creations Hunting Palz. You can find the set Here:http://www.scrappydew.com/store/animals/forest_theme.html The bear in this set just cracks me up! LOL

For any of you with hunters in the family, this is the perfect set to scrap all those types of photos. 
 This is my completed card, the whole card folds up for easy mailing. My card base measures 5 7/8 wide by 6 inches high and 1 1/4 wide at the base. You can find the tutorial Here
The top I have left blank for adding sentiments at a later time. 

Bazzill Green and Brown Cardstock
DCWV Textured Neutrals
Inks
Tim Holtz Checkerboard and Cracked Texture Fades Embossing Folders
K&CoMPANY Ancestry Paper Stack

Thanks For Looking!
Michelle

Friday, July 27, 2012

Back 2 School Clipboard Calendar


With school right around the corner, I thought I'd make this cute calendar for my sons aid.

I used the Back2School Palz set by ScrappyDew. I purchased a package of clipboards from Walmart. They are sold 2 to a pk. for $1.88, they are nice and sturdy. Layered some white cardsock and some patterned paper and inked all the edges. I used a punch by Martha Stewart called Cherish and punched the edge of my white cardstock. 

I download some 4x6 calendars from www.calendarsquick.com/, printed and trimmed them. Be sure to print both 2012 and 2013 calendars. I punched holes in each of the sheets and joined them together using heart brads. You need to center the calenders on the layered patterned paper and mark with a pencil where the brads are. Then you will punch your holes so you can adhere the calenders using the heart brads. I used my hot glue gun to adhere everything to the clipboard. 

When using the hot glue, be sure to firmly press down on your background paper to the clipboard fairly quick. You don't want to have thick spots under you project where the glue is. Once the glue sets up, then you can decorate how you wish.

I used some flourishes, flowers and rhinestones.

This is a very inexpensive project to make, and would make a great back to school teacher gift. 


Supplies Used: ScrappyDew Back2School Palz, Trendy Twine, Cardstock, Cherish Punch, Recollections Jar and Package Flowers, CalendersQuick.com, AC Cardstock Silver Foil, Ancestry Paper, Studio G Ink, Sakura Gelly Roll Pen, Making Memories Heart Brads, Rhinestones.

Thanks for looking
Michelle

Monday, July 23, 2012

Baby Boy Card


I used the Baby Giraffe freebie that was offered in last weeks ScrappyDew newsletter to create my card. You can find the free file Here My card design is based from the MojoMonday 250 Card Sketch. 


I also used the front mat for the inside of my card.

Supplies used

ScrappyDew Baby Giraffe
DCWV Baby Boy Stack
Stickles-Firefly
Bazzill Brown Cardstock
White Ribbon
Fiskars Baby Stamps

Thank you for looking.
Michelle

Tuesday, July 3, 2012

July 4th Card


This is my second project using the July 4th Palz. Created this card for my MIL, from my son. 

I used a Tim Holtz embossing folder for the white mat and 4 different colors of Stickles for the bursts and stars.

My card started out as a flag card and then took another turn, LOL I created the star border in MTC using basic shapes and stars. I do have a 4th of July paper stack somewhere but of course I could not find it!


This is the back, still using the same set of Tim Holtz embossing folders.

Supplies Used
ScrappyDew 4th of July Palz
Stickles- True Blue, Silver, X-mas Red and Frosted Lace
Tim Holtz embossing folders
Cardstock

Thank you for looking,
MichelleMyBelle