Showing posts with label Beth Fiscus. Show all posts

Thursday, July 25, 2013

Magical Memories Birthday Card

I used the set Magical Memories.  Instead of using one of the kids that are included in the files, I decided to look at each individual element and make a card from there. This is what I made!

I took the mouse head from the shirt of the little girl and enlarged it to make it the focal point of my card.  For the bow I took matching ribbon, tied a knot in it and wrapped it around the paper bow cut out.

The background is embossed with a happy birthday embossing folder and the sentiment is from stamp this set by Whimsy Stamps.

I hope you have a wonderfully crafty day!

Monday, July 8, 2013

Cub Scout Card


This is my latest design team project for ScrappyDew.  I have a nephew who is a cub scout and when I saw their Boy Scouts SVG files, I couldn't help but make him a card.
I made the outfit look just like my nephew's :)  The background behind the boy die cut is embossed with a swirls and stars embossing folder and the boy is adhered with foam tape.  I tried something different this time and used a peachy keen face stamp instead of the included face parts in the SVG file.
The finishing touches are some Beary Brown rumpled ribbon, a bottle cap with an epoxy overlay featuring the boy scout symbol in the SVG files, and the sentiment flag that I stamped.
I hope you have a wonderfully crafty day!

Wednesday, June 26, 2013

Baby Overalls Card

I am back with another design team project for ScrappyDew!  This cute little card is what I decided to make after going through my stash of cards and realizing I had NO baby boy cards on hand.  I always like to have cards ready for whatever occasion might sneak up on me, so now I am prepared :)  I used the super cute overall cutting design that is included in the Scrappy Babyz Collection that is only available in the ScrappyDew Vault.  If you are not familiar with their vault, it is a one time purchase and you get an amazing number of designs...plus more are periodically added and you get those too!  A great value for adorable SVG files.
To make the overalls look more baby like and to add a pop of color, I added a rubber duck from their Carnival Theme Park collection.  Isn't is so cute?!  The buttons and white thread added dimension and texture to the card.
This is to show you how I constructed the shape of the card base.  I simply welded two overall shapes together at the top of the straps.  I added a stamped sentiment and made faux stitching lines all around the card with a white gel pen.
I hope you have a wonderfully crafty day!

Wednesday, June 12, 2013

Sew Grateful Card

I used the adorable Sewing Palz SVG files for the pin cushion, needle and the spool of thread. I think they were a perfect match for the patchwork patterned paper.  I also carried the sewing theme with the ribbon that has stitching lines on it and I also used my sewing machine to sew the background papers together.  The sentiment is a digi stamp from Clearly Digi Stamps.
 This is a close up of the focal point.  I thought the burlap behind the die cuts allowed for more of a solid color behind them, but still added texture and visual interest.
Here I am trying to show you the layers of dimension and textures.  I also added glossy accents to the needle and the pin heads.  There is a lot going on with this card LOL!
I hope you have a wonderfully crafty day!

Thursday, June 6, 2013

Graduation Layout

Hi everyone!  I am back with another ScrappyDew design team project.  I love the cuteness of their designs!  They are absolutely perfect for scrapbooking for my boys.  This is a double page layout with 8.5" x 11" papers.  It features cutting files from Graduation-2013.
 This is the first page.  Look at all that kindergarten cuteness :)
I used the label that is from the SVG set to make the background for the title.  Then I made banners using the colors that were in the argyle paper and wrapped twine around it.
 
But there is a surprise...the top part of the label lifts up to reveal all of the kids' names!  I welded two of the label shapes at the top in SCAL2 to create that effect.
The second page shows close-ups of my proud graduate!  He was so excited!!
And finally a shot of the graduate boy from that set.  I used foam tape to pop him up and made confetti and streamers around him.  As for making the streamers and confetti...grab whatever scraps you have on your work space, trim narrow strips, curl them and randomly add them to your layout.  For the confetti, find your paper puncher and empty it LOL! 
I hope you have a wonderfully crafty day!

Saturday, June 1, 2013

Tool Bench Card

Tool Bench Card

This is a card I made for my Father-in-law.  He is Mr. Fix It!  If you know someone who fits that description, it would also make a wonderful Father's Day card for them too.  I also wanted to demonstrate the versatility of ScrappyDew files.  About a week ago I showed you this card that I made using their Tool Box Bundle Package SVG files.  I really like how that one turned out with the detailing on the tools.  For this one, I decided to just use the silhouettes of the same tools to go for a completely different look.
I cut the tools out of black cardstock 2 times each and glued them on top of each other so they would be a bit thicker.  The background paper is from DCWV's Boyhood stack which is a 8.5x11" stack.
I created the workbench by using the Vintage collection paper by Core'dinations and embossed it with a wood grain embossing folder, sanded it, then used brown chalk around the edges.  I added two brads that look like screws and tied two cotton twine pieces around it.  I popped it up with foam tape.

I hope you have a wonderfully crafty day!

Thursday, May 30, 2013

Flip Flop Card

I used the beautiful flip flop SVG files from ScrappyDew's Vault.  If you are not a vault member of theirs, you are seriously missing out!  Once you purchase the membership, not only do you get access to a ton of designs they already have in there, they periodically add more designs and you get those for free.  PLUS there is a coupon code for vault members that lets your purchase their regular store designs for super cheap.  Can you tell I am a happy vault member?? LOL!  Here is a link that you can see some of the designs they have in their vault.  They have added more since!

Anyway, here is the card I created from the flip flops.  They cut like a charm on my Cricut!

I used water paper from a DCWV Photo Real stack for the top part of the background.  The flowers on the flip flops are some of the built in shapes in SCAL2.  Then I used the Round 14 Epiphany Crafts shape tool to add a little extra visual interest to the center of the flowers.
I created the sand using Core'dinations Vintage Collection cardstock.  I tore two layers, embossed it then sanded it to reveal the core kraft color.  The sentiment I printed off from my computer, layered it with a scalloped punch and popped it up on foam adhesive.

Some beach...Somewhere...  Actually just being able to play with my paper helped me a lot more than getting sunburned on some hot, sandy beach would have LOL!

Wednesday, May 8, 2013

Veggie Card


The cucumber and tomato are SVG's from the Vegetables set at ScrappyDew.  They were super fast and easy to assemble but turned out adorable!  I also embossed the cucumber with a striped embossing folder to make it look a little more like Larry :) 


The background is random sized circles adhered to white cardstock, then embossed with a really neat polka dot The Paper Studio brand embossing folder. 


I added pop dots behind both the square and the vegetables for maximum dimension.  The best part of that was my son tipping the card sideways and asking what the little squares were that were behind the paper!  LOL! 

Sunday, May 5, 2013

Hot Air Balloon Card

This card is very simple because I wanted it to reflect the free feeling of the balloon floating up in the sky.
All of the patterned papers are from K&Company's Wild Saffron paper pack.   I added the banner in the background by just cutting triangles from the patterned paper scraps. The yellow section of the balloon is embossed using a striped embossing folder. The balloon is popped up with foam adhesive as well.

I hope you are having a wonderfully crafty day!

Saturday, May 4, 2013

Cowgirl Birthday Card

This is my first project as an official member of the ScrappyDew design team!  I was a guest designer for them and now I get to stick around for a while longer!  I am so excited! 
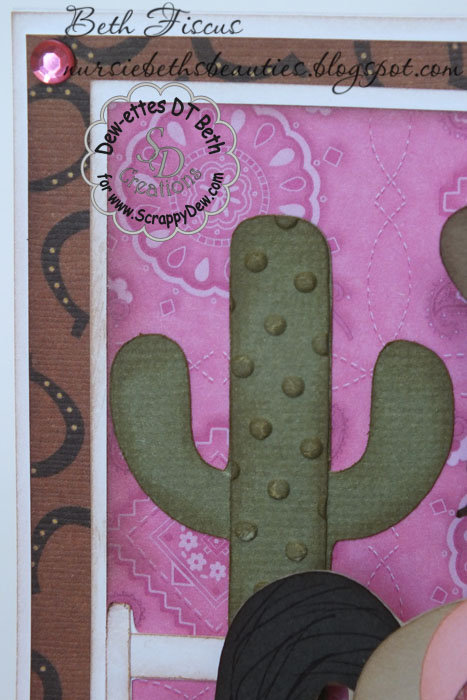
This card was for my niece's 10th birthday.  It is so hard to believe she is that old already.  I am not sure where the time went.  Anyway, she has wanted a horse of her own for a few years already, so I thought this card would be very fitting for her :)  Plus I don't get to make girly things that often, so I decided to go all out for this one! All of the cuts- cowgirl, horse, fence, and cactus, came from the Cowboy Kids SVG set at ScrappyDew.  The card base is a 5.5" square.
There were a lot of layers in this one and it took a bit of time, but it was so very worth it!  I guess the card was brought around to all the family members and they tried to count the different pieces of paper that I used LOL!  I guess you could say that I provided entertainment for the night even though I couldn't be there :) 
And it wouldn't have been as fun without an actin wobble behind the horse, now would it?  This shows my 3 year old having fun with it!
 And just to add a bit more dimension, I used my swiss dots embossing folder to jazz up the cactus. 
The pink and green bandanna papers were from a Debbie Mumm paper pack that I had picked up at Jo-Ann Fabrics a long time ago and it was just perfect for this card.  The horseshoe paper was from the Yee-Haw paper pack by The Paper Studio. 

I hope you all enjoy this card and have a wonderfully crafty day!

Wednesday, May 1, 2013

My First Haircut Layout

This is another guest design team project for ScrappyDew.  I was inspired to use the files from the First Haircut SVG set on this layout since I just recently gave my youngest his first haircut!  He looks so much bigger and older now that his hair is all trimmed up :) 
This is the title that is included in the files of that kit.  I think it is the perfect addition to the page!  I used pop-dots under it for dimension.
And finally a close-up of the boy and the hairdresser/mom that I added to the page.  I created the glasses to the mom so it would look more like me :)  I made them by welding simple shapes together in SCAL2.
This layout isn't overly busy or embellished to the max, which I tend to do sometimes, but I think in it's simplicity it documents this sweet moment just right.
I hope you enjoy it!

Bus Driver Thank You Card

Hello all!  Happy May Day!  Today I am sharing a very quick project that I made for my son's bus driver.  He is such a good bus driver...couldn't ask for a better one.  Since school is over very soon here, I knew I had to get something made for an end of the year thank you for bringing my son to and from school safely every day.  So here is what I made:
The card is very simple and I used the school bus SVG from the Back to School set at ScrappyDew.  For the card base I just flipped one copy of the bus background and welded it at the front in SCAL2.  Easy peasy!  Instant card.
Then I made a bus key chain using a 1" circle punch, 1" epoxy circle and a bottle cap.  Another super simple project.
Throw in a box of chocolate...because who doesn't like chocolate?  And you have a cute and quick gift!

Wednesday, April 24, 2013

Hershey's Kiss Card

Hello all!  I am back with another project for ScrappyDew.  As soon as I saw the Land of Candy set I fell in love with it!  My two older boys love to play Candy Land and this set matches it perfectly.  For this project I needed something a bit different.  I made a end of the year thank you gift for my son's kindergarten teacher.  I really don't know how she handles all 24 kids in his class, but she does!  I think anyone who has that many 5 and 6 year olds in their care deserves a little chocolate :)  Or a lot depending on the day.  So I used the adorable boy holding the chocolate candy from the Land of Candy set and made it into a card!  Then I doctored up a pint canning jar to coordinate and filled it with Hershey's kisses and hugs.
Here is the card that I made.  I tried to make the little boy look like my son. 
The Hershey's kiss in the boy's hands is super shiny.  I coated it with 2 layers of glossy accents to give it a little something extra.
A close up of the details...dimension, dimension!  I tried a new technique of folding paper to make it look like pleated ribbon and made it into a border between the two designer papers.  The sentiment was a rub-on and I used a 1" punch and added an epoxy circle to the top.  The little boy is on pop dots as well to accommodate for the extra height of the pleated cardstock.
All the patterned papers were from DCWV's dots, stripes, and plaids stack.  I love that the colors are so bright and springy because we could use a little spring here...there is still snow on the ground!

Sunday, April 21, 2013

Birthday Wishes by Beth Fiscus

I decided to make a Thomas the Train birthday card to give to one of my nephews.  After all, what little boy doesn't love trains??  I used the new Choo Choo SVG's from ScrappyDew.  They are so adorable!  I cut the files small enough to fit on a A2 size card.  Here is how it turned out:

 
A close up of Thomas
and of the railroad crossing sign.

For the sky I used a piece of paper from K&Company. For the grass I simply used a decorative scissors and cut two different layers of green cardstock.